Leaf Cutting Techniques: The Proper Twisting Method Most Propagators Get Wrong
If you have ever snapped off a perfect leaf and hoped it would root, you are already halfway into leaf cutting, but the real difference comes from how you twist and handle that leaf. Leaf cuttings typically root in about two to three weeks at around 70°F media temperature, so getting your twisting technique right at the start can save weeks of frustration.
Key Takeaways
| Question | Short Answer |
|---|---|
| What is the “proper twisting method” in leaf cutting? | It is a gentle, controlled twist at the petiole or leaf base that separates tissue cleanly without crushing, helping roots form along a healthy wound surface. |
| Which plants respond well to twisting leaf cuttings? | Succulents like moonstones, Peperomia varieties, and even some Lithops respond well when we combine clean cuts with careful twisting, as we show in our Moonstone succulent guide. |
| How long does it take for twisted leaf cuttings to root? | Most leaf cuttings root in roughly 2 to 5 weeks, depending on species and temperature, and then need several more weeks before new plantlets appear. |
| Do I twist or cut Peperomia leaves for propagation? | We usually combine both: a clean cut plus a small twist at the petiole or along a midrib, as outlined in our detailed guide on how to propagate Peperomia. |
| Can I use twisting techniques for other propagation methods? | Yes, twisting shows up in air layering and careful stem handling, and you can combine those with our general succulent propagation methods for better success. |
| How do I avoid transplant shock after leaf cuttings root? | We acclimate young plants slowly and handle roots gently, following the principles in our guide on propagation and transplanting. |
| Is twisting safe for sensitive plants like Lithops? | For Lithops we keep twisting extremely minimal and focus on very clean cuts, as covered in our Lithops care and propagation guide. |
1. What “Proper Twisting” Really Means In Leaf Cutting
When we talk about the proper twisting method, we are not talking about yanking leaves off the stem. We mean a controlled, gentle twist that separates the leaf with an intact base so roots have a clean area to develop.
Most failed leaf cuttings come from crushed tissue or torn petioles, not from bad soil or light. Twisting correctly gives your cuttings a smooth wound edge that dries and calluses evenly before rooting.
- Always support the stem with one hand while you twist with the other.
- Twist slowly until you feel the natural release, never force a break.
- Check the base, it should look clean and complete, not shredded.
This basic move works on Peperomia, many succulents, and some trailing plants where leaves detach cleanly from stems.


2. Preparing Leaves For Twisting: Tools, Timing, And Clean Cuts
Before we ever twist a leaf, we make sure the plant is hydrated, healthy, and not stressed from recent repotting or heavy pruning. We also pick a time of year with good light and moderate temperatures, since most leaf cuttings root best in active growing seasons.
We always pair twisting with sharp, clean tools. Even if you twist the leaf off, you may need to trim the base or cut along a vein, especially in plants like Peperomia where leaf sections can root.
Basic prep checklist
- Use sterilized scissors or a razor to clean up jagged edges.
- Let succulent leaves callus for 1 to 3 days after twisting and cutting.
- Aim for media temperatures near 70°F to support rooting.
A calm, unhurried setup here makes the twisting step safer and more predictable.
3. Step‑By‑Step: Proper Twisting Method For Succulent Leaf Cuttings
Succulents are our favorite plants for demonstrating the twisting method, because their leaves usually detach in one smooth motion. With moonstones and similar varieties, we hold the leaf near the base, brace the stem, and rotate the leaf side to side until it pops off cleanly.
After twisting, we inspect each leaf and discard any that have missing bases or deep tears. Those damaged leaves tend to rot or struggle to form roots, even if the rest of the care is perfect.
- Choose a plump, unblemished leaf on a healthy stem.
- Grip the leaf at the base with two fingers, support the stem with the other hand.
- Twist gently left and right while applying light downward pressure.
- Stop as soon as you feel it release, do not keep twisting after it separates.
- Lay the leaves to dry and callus if they are succulent types.
This same pattern also supports more advanced setups that combine twisting with other methods, like staged propagation trays.
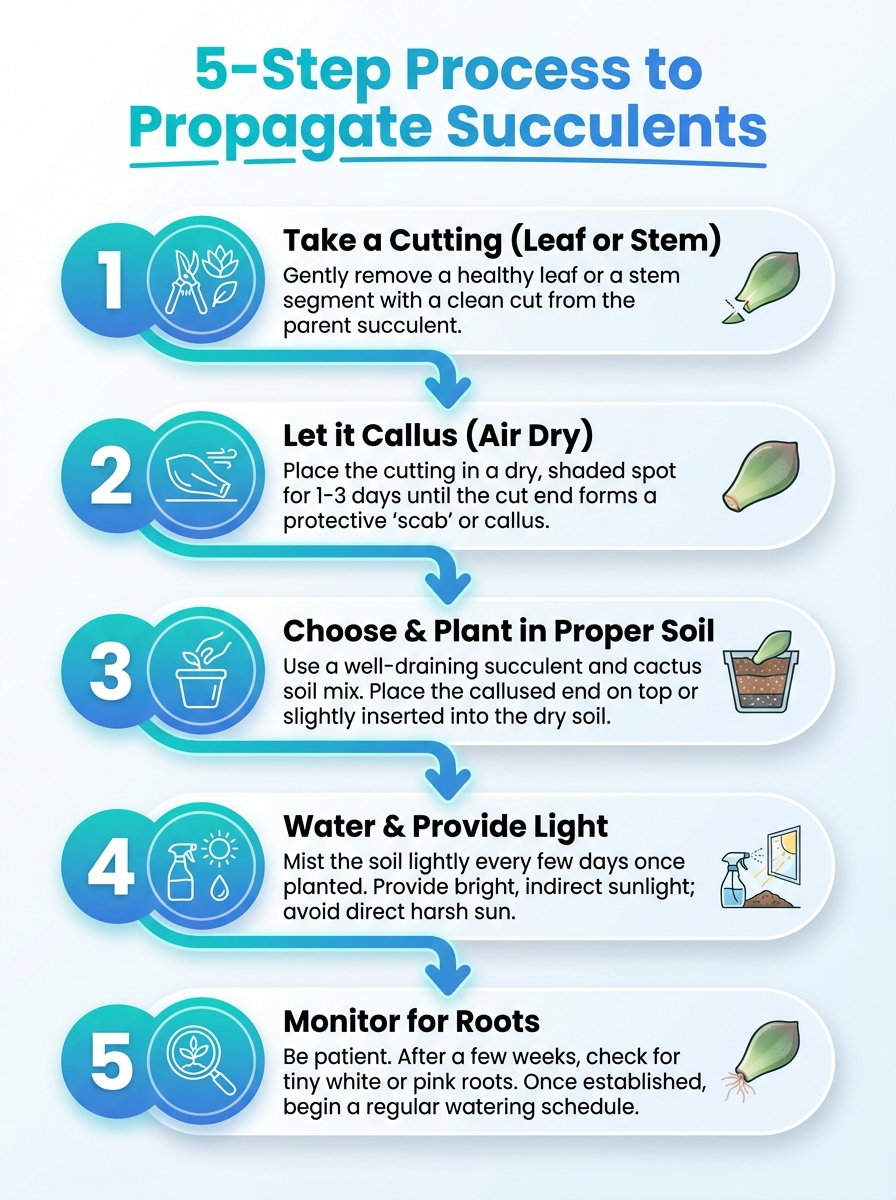

A step-by-step visual guide to propagating plants via leaf cuttings using the twisting method. Learn how to twist correctly to maximize success.
4. Using Twisting With Peperomia Leaf Cuttings
Peperomia gives us more options, because we can propagate from whole leaves, leaf sections, or even just petioles. We still rely on a firm but gentle twist to detach the leaf, then we decide whether to keep it whole or cut it into pieces along the veins.
When we remove Peperomia leaves, we favor a twist that brings away a small piece of stem or at least a complete petiole. This helps the cutting sit deeply and steadily in the rooting mix.
Peperomia twisting tips
- Choose leaves from the middle of the plant, not the oldest or newest.
- Twist smoothly, then trim the petiole to the length you want for inserting.
- For leaf sections, slice across the leaf and set the cut edge into the mix.
After twisting and trimming, we place Peperomia leaves in a loose, airy medium and keep moisture light but steady while roots form.
5. Twisting And Stem Work: When Leaves Are Not Enough
Sometimes we pair leaf twisting with stem cutting, especially on plants that root more reliably from stems, like creeping fig or fishbone cactus. In those cases we still twist leaves off carefully, but our main cutting is a piece of stem with one or more nodes.
For creeping fig, we trim stems into short segments, then remove lower leaves using a slight twist so we do not tear the bark. Tidy nodes mean cleaner rooting and fewer problems later.
Stem and leaf combo workflow
- Make a clean stem cut below a node with sterile scissors.
- Twist off lower leaves to expose nodes for rooting.
- Leave one or two upper leaves to support the cutting.
On fishbone cactus, we usually cut full segments instead of using leaf cuttings, but the same gentle handling principle applies along the tender edges.


6. Moisture, Media, And Timing After Twisting
Once leaves are twisted off correctly, what happens in the rooting tray matters even more than the initial cut. We prefer a light, well draining mix, usually something like a blend of perlite and peat or a gritty succulent mix for fleshy leaves.
Leaf cuttings usually root in 3 to 5 weeks in general houseplant conditions, and we do not rush them by overwatering. Constant wetness around a fresh wound is one of the fastest ways to lose a whole batch.
| Stage | What We Do |
|---|---|
| Immediately after twisting | Let succulent leaves dry until the cut edge calluses, usually 1 to 3 days. |
| First 2 weeks | Mist or lightly water the substrate, avoid soaking. |
| Week 3 to 5 | Check for roots and early plantlets, maintain bright indirect light. |
We keep airflow decent, but not drafty, and avoid direct scorching sun on new cuttings since their tissues are still vulnerable.
7. Avoiding Common Twisting Mistakes That Kill Leaf Cuttings
Most problems we see with leaf cutting techniques start before the leaf ever touches soil. Over twisting, bending too sharply, or twisting dry, stressed leaves can all crush the base and slow or prevent rooting.
Another common issue is twisting the wrong type of leaf. Some plants prefer a straight cut instead of a twist, especially very stiff or woody foliage that will not release smoothly.
Typical twisting mistakes
- Snapping leaves upward instead of twisting sideways.
- Twisting multiple leaves at once, which stresses the stem.
- Handling the leaf base repeatedly, which can reopen the wound.
We also pay attention to hygiene, since any crushed or open tissue is more vulnerable to fungal problems in overly wet conditions.
8. Special Cases: Lithops And Other Sensitive Leaf‑Like Plants
Plants like Lithops look like leaves, but we treat them with more caution. We rarely use a twisting motion on their bodies, and when we do any propagation work we focus on very precise cuts and careful aftercare.
For Lithops, we usually rely more on seed or offsets than leaf cutting, but the same principles still help. Any handling of their fleshy parts has to be slow and deliberate, avoiding crushing or tearing.
- Use very sharp blades for any necessary cuts.
- Avoid twisting the whole body, it is easy to bruise.
- Keep watering extremely controlled during recovery.
Our goal with sensitive species is always minimal disturbance, with twisting either extremely gentle or replaced with cuts where needed.
9. Moving From Twisted Leaf To Young Plant: Potting On Without Shock
Once roots and tiny plantlets appear at the base of your twisted leaf, the next big risk is rough handling. We like to wait until roots are at least about an inch long before shifting cuttings into individual pots, especially for species that dislike root disturbance.
We loosen the media gently and lift each leaf by the leaf blade, not by the new plantlet or root mass. Any sudden bend or twist at this stage can snap fragile tissue.
Transplanting routine
- Pre moisten the new potting mix so you do not have to drench it after planting.
- Make a small hole, set the rooted base and plantlet in, and backfill gently.
- Keep light bright but indirect and watering modest for the first week or two.
This calm transition keeps all the benefits you gained by twisting properly at the start, instead of losing them to transplant stress.
10. Practical Twisting Method Checklist You Can Reuse
To keep things simple, we like to run through the same checklist every time we start a new round of leaf cuttings. This helps us avoid skipping key steps when we are working with a lot of plants at once.
We also jot down dates, because propagation from a single leaf can take 14 to 16 weeks before you have a sturdy plant ready for a new pot. A small notebook or spreadsheet can keep expectations realistic and routines consistent.
| Step | Action |
|---|---|
| 1. Plant health check | Choose hydrated, pest free donor plants. |
| 2. Tool prep | Sterilize scissors or blades, prepare trays and media. |
| 3. Twisting | Support stem, twist leaf gently until it releases cleanly. |
| 4. Wound care | Let succulent leaves callus, trim ragged bases as needed. |
| 5. Rooting stage | Place on or in media, control moisture and light. |
| 6. Potting on | Move rooted plantlets to small pots without bending roots. |
If you follow this routine, your twisting technique becomes part of a complete, predictable propagation system instead of just a quick way to remove leaves.
Conclusion
Proper leaf cutting techniques start with a small, simple move, a gentle twist at the right spot, but that move sets the tone for everything that follows. When we twist cleanly, keep our tools sharp, and respect each plant’s limits, we give our leaf cuttings the best chance to root well and grow into strong, long lasting plants.
If you treat twisting as part of a complete process instead of a quick rip, you will see the difference each time you look at a tray full of healthy new rosettes, vines, or succulents that all started from a single carefully handled leaf.